Showing posts with label Christmas. Show all posts

Tuesday, January 5, 2010

Gluten Free Rustic Holiday Tart Review - Oak Street Natural Market

I had to give Oak Street Natural Market’s rustic holiday tart a try, for the sake of this blog really. I pre-ordered two tarts and picked them up the day before Christmas Eve. They travelled great until I got to my parents house and managed to drop one, I’m good at things like that. It was still edible just not very pretty so I was obligated to graze on the crumbs to save the rest of the family from having to eat it. I thought the tarts were delicious, they weren’t too sweet and the crust was to die for. It was so good I could have just eaten that alone. It was crisp on the outside but not dry and the subtle sweet to it was perfect. I want to make crust like that.


When I was picking the tarts up I noticed that Oak Street Natural Market now offers gluten free bread as an option for their sandwiches. It costs $1 more but that’s standard and the great part is it offers another lunch option for us GFer’s in the area.

Wednesday, December 23, 2009

Gluten Free Sugar Plum Cookies

To prepare for the small road trip we’ll be taking for Christmas the boy and I made some granola bars, he’s such a great helper in the kitchen until it’s time for cleanup. I was telling him what the different ingredients were that we put in the bars and when I added the buckwheat he informed me that he can’t eat that because it has wheat in it. It was so sweet and I did my best to explain that even though it has the word wheat in it it doesn’t have gluten so it’s safe. The granola bars had GF butterscotch chips, chocolate chips, raisins, and coconut in them. They were delicious and I’m a big fan of the butterscotch.

I saw a sign for sugar plums the other day and not knowing what one is I had to look up some recipes. Most of the recipes include dried fruit but this recipe was the exception and as I looked at the picture and read the recipe it sparked a memory. I don’t know where I’ve had these cookies but I have had them. All I can recollect is I was little and I associate them with a grandmother type figure. I’m not sure if one of my Grandma’s made these or if one of their friends did. After I put them together and took my first bite I knew these were the cookies. Funny how I didn’t even know I missed them until I saw them again.

I will be giving some to my Grandma when we see her over Christmas and I’m hoping my mom or dad will remember them. I want someone else to remember them! My IL’s were over to the house and they ate a few of them (I was pleasantly surprised) but had never had them before. It’s a mystery.

These cookies aren’t the prettiest things in the world and when you’re mixing it together it looks like ground beef. I decided to save you from looking at that picture. They’re very fast and they’re no-bake so it can’t get much easier. I like these a lot. At first they have a little bit of tartness to them but then it’s all sweet, and very sweet at that. My husband said they taste like raspberry zinger’s just without the crème filling.


Gluten Free Sugar Plum No-Bake Cookies
Adapted from All Recipes


1 can (14 oz) of sweetened condensed milk
1 package (3 oz) strawberry flavored gelatin (cherry or raspberry would also be good)
1 ½ C shredded coconut
2 C GF graham cracker crumbs, I used the crumbs from our Gingerbread House
1 package (3 oz) strawberry flavored gelatin
40-ish whole cloves

Pour the milk into a mixing bowl and add 1 package of the gelatin. Stir until it’s dissolved and then add the coconut and GF graham cracker crumbs until a stiff dough forms. Pour the remaining gelatin package into a small bowl. Roll the dough into 1 inch balls and then roll the balls in the gelatin to coat. Place on wax paper and press a whole clove into each cookie to form a stem. This process is pretty messy so to make it a little less messy I used my Pampered Chef small-scoop then dropped the ball directly into the gelatin. Otherwise your hands will be covered in goop. This made 42 cookies for me.

Monday, December 21, 2009

Gluten Free Holiday Shoebox Swap

I’m part of a Yahoo Gluten Free Recipes Group and this year some of us got together for a Holiday Shoebox Swap. This was a lot of fun and it just so happened that my swap partner also had me. Carrie at Ginger Lemon Girl was my partner and on Friday I came home to a wonderful package of GF treats. She gave me chocolate, recipes, preserves (cherry which is my favorite), coffee, chap stick, a Christmas towel, Werther’s, A Wrinkle in Time (can’t wait to dive into this book and Hubby was surprised I hadn’t read it already), a Kind bar (Hubby and I will split this since we both want it and I’m so glad I can finally try one), blueberry muffin mix, and a mix for one of Elana’s recipes. It was so much fun getting this early Christmas present and I can’t wait to dive into all of it. So far I’ve only enjoyed a couple Werther’s and I’m enjoying the coffee right now. Thanks Carrie, you did an awesome job!

Friday, December 18, 2009

Naturally Gluten Free Candy

I love making candy for Christmas and these three are my regulars. It makes the entire family happy so why fix something that isn't broken? The cookies are my molasses cookies and they turned out fantastic.


Chocolate Covered Cherries


I remember when I saw my first homemade chocolate covered cherry. I was amazed it was something that could be made at home and I knew that I had to give it a try. This was way back before my cooking and baking days, mom was still doing all of that for me. It wasn’t until I was married that I finally tried my hand and the reason I did is because my mom is a huge chocolate covered cherry fan, so I make this for her every year. These are a little bit time consuming because you have to wait for things to sit but they’re fast to dip in the chocolate and so worth the time.


Chocolate Covered Cherries
From Better Homes and Gardens New Cook Book

60 maraschino cherries w/ stems
3 T butter, softened
3 T brown rice syrup or corn syrup
2 C powdered sugar
1 lb chocolate bark

Drain the cherries on paper towels for several hours. Moisture from the cherries will cause the butter mixture to liquefy.

Mix together the butter and syrup until smooth. Stir in the sugar and knead until evenly mixed and smooth. Shape a ball of the mixture around each cherry and place on a baking sheet lined with wax paper. Chill until firm, not too long of the sugar mixture will begin to liquefy.

Melt the chocolate bark in a microwave safe bowl. I zap it for 1.5 minutes then do 1 minute intervals stirring between each minute until it’s smooth. Holding the cherries by the stem dip into the coating making sure to get a complete seal. Let the excess chocolate drip off the cherry and place on waxed paper. Once the chocolate has hardened store in an air tight container in the refrigerator. Let them ripen (liquefy) 1-2 weeks.


Fudge


Fudge is a classic Christmas candy and this fudge recipe is not only easy but it’s also pretty tasty. I love pairing it with coffee but be warned this can be addicting. I don’t put nuts in my fudge, I believe it ruins it but if you are a “nuts in your fudge” kind of person then feel free to add them.


Remarkable Fudge
From Better Homes & Gardens New Cook Book

4 C granulated sugar
2 5 oz cans evaporated milk (low fat works)
1 C butter
12 oz semisweet chocolate chips
7 oz candy bar cut up, milk or dark chocolate
7 oz jar marshmallow crème
1 t vanilla

Line a 13”x9”x2” pan with foil and spray with non-stick cooking spray. Butter the sides of a 3 qt saucepan and then combine the sugar, evaporated milk, and butter. Cook and stir over medium-high heat until it boils. Reduce heat to medium and cook and stir another 10 minutes.

Remove from heat and add the chocolate chips, candy bar, marshmallow crème, and vanilla. Stir until it’s combined with a wooden spoon and then beat by hand for 1 minute. Spread in the pan and score into 1” squares while it’s still warm. Once it has completely cooled lift the fudge out of the pan using the foil and cut into square.


Peanut Butter Balls


I started making these for my dad years ago for Christmas. They were something that was naturally gluten free and I knew he loved them. I was impressed with how easy they were and since the rest of us love them too it’s become a tradition. The only problem with them is that they disappear way too fast. I always double this recipe, a single batch just isn’t enough.

Peanut Butter Balls
From Better Homes & Gardens New Cook Book

½ C peanut butter
3 T butter, softened
1 C powdered sugar
8 oz chocolate bark

Mix together the peanut butter and butter until smooth. Add the powdered sugar stirring until it’s all combined, sometime I use my hands toward the end to knead it together. Shape into 1” balls and place on waxed paper allowing it to dry, about 20 minutes.

Melt the chocolate bark in a microwave safe bowl. I zap it for 1.5 minutes then do 1 minute intervals stirring between each minute until it’s smooth. Dip the peanut butter balls into the candy coating one at a time. Use a fork to let the excess chocolate drip off the ball and then place on waxed paper until the coating is firm. Store in an airtight container in the refrigerator.

Monday, December 14, 2009

Gluten Free Gingerbread House

Last year for Christmas we bought a gingerbread house kit from Costco, my boy and I had fun putting it together and I figured we’d do it every year. Then we went gluten free and I realized it was no longer as easy as buying a kit. Bummer. We took the journey of making our own gingerbread house from scratch and it was actually pretty easy and not as time consuming as I expected. Well, once I stopped trying to do things the hard way. I’m really good at doing things the hard way first and then figuring out the best way a few frustration levels later.

The first thing was to find a template online so I could just cut it out and go. The one I used was from gingerbread-house-heaven.com. I cut the templates out then traced them on cardboard for a more stable template.


For the gingerbread I used my graham cracker recipe and it worked perfect. I made a double batch and rolled half of the dough onto a greased 16.5”x13” cookie sheet. You could use a smaller sheet you just may need to use a bit less dough. Once the dough was rolled out I placed the cardboard templates on the dough and used a sharp knife to trace the templates. I had some extra room so I used cookie cutters to cut out trees and gingerbread men, my men didn’t survive to make it on the final product but there’s always next year. Bake for 15-17 minutes then allow them to cool. Once they’ve had about 10 minutes to cool cut the trace marks through with a sharp knife and if you used cookie cutter shapes re-cut the shapes with the cookie cutters. Once it’s completely cooled you can remove the excess graham from around your shapes and save in a bag for graham cracker crumbs, you can always made a yummy piecrust with those. I made the gingerbread the night before to give it plenty of time to cool and harden, it worked perfect for me.


The next thing is the frosting and I expected this to be a pain in the butt and take awhile, it was easy and fast so I was wrong. Maybe it was just an excuse for me to procrastinate a bit. I used royal icing and be sure to keep the icing from being exposed to air, that’s what makes it harden so immediately put it in a Ziploc bag and seal it up. You can then cut the corner of the bag and use it to pipe the icing on your house and for your decorations.

Royal Icing

3 egg whites
½ t cream of tartar
4 C powdered sugar

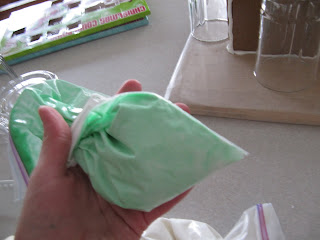
In a large bowl whip together the egg whites and cream of tartar until its foamy. Add the sugar gradually whipping the whole time. I whipped it by hand with a whisk and toward the end when it was getting thick I just used a fork. I poured the icing into two baggies, one for white and one for green. I added some green food coloring and then massaged/mixed the color in until it was evenly mixed together. If the icing is too runny whip it longer to get it to thicken up. You want it thick enough to stay when you pipe it but not too thick to where you can't easily use it.

Start by laying the four walls down then put icing along one edge to stand the first wall up. Use a glass to support the walls while icing the others in place. As walls meet ice them together on the inside and outside and let it sit until it is sturdy. It only took about 10 minutes until I felt like it was ready for the roof. Put icing along the tops of the walls and place the roof pieces on top, ice the peak of the roof to help stick them together. For the trees I used green icing to glue the trees together along the edges, I glued 3 trees together to make 1 tree. These were a bit more difficult to put together but once the icing set a little bit they held.

I drew the windows and door onto the house with icing and then I followed the kids’ lead on where to put icing so they could decorate with the candy. We used M&M’s, gumdrops, cinnamon drops, mint leaves, gluten free licorice (which I found at Oak Street Natural Market), and sprinkles. I was really impressed with how well the kids did and we had a lot of fun.

I’m glad we can continue this tradition and happily make it gluten free.