The first thing was to find a template online so I could just cut it out and go. The one I used was from gingerbread-house-heaven.com. I cut the templates out then traced them on cardboard for a more stable template.

For the gingerbread I used my graham cracker recipe and it worked perfect. I made a double batch and rolled half of the dough onto a greased 16.5”x13” cookie sheet. You could use a smaller sheet you just may need to use a bit less dough. Once the dough was rolled out I placed the cardboard templates on the dough and used a sharp knife to trace the templates. I had some extra room so I used cookie cutters to cut out trees and gingerbread men, my men didn’t survive to make it on the final product but there’s always next year. Bake for 15-17 minutes then allow them to cool. Once they’ve had about 10 minutes to cool cut the trace marks through with a sharp knife and if you used cookie cutter shapes re-cut the shapes with the cookie cutters. Once it’s completely cooled you can remove the excess graham from around your shapes and save in a bag for graham cracker crumbs, you can always made a yummy piecrust with those. I made the gingerbread the night before to give it plenty of time to cool and harden, it worked perfect for me.

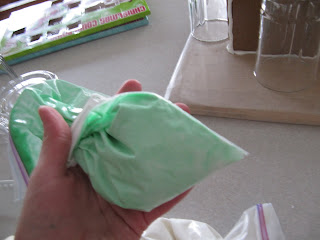
The next thing is the frosting and I expected this to be a pain in the butt and take awhile, it was easy and fast so I was wrong. Maybe it was just an excuse for me to procrastinate a bit. I used royal icing and be sure to keep the icing from being exposed to air, that’s what makes it harden so immediately put it in a Ziploc bag and seal it up. You can then cut the corner of the bag and use it to pipe the icing on your house and for your decorations.
Royal Icing
3 egg whites
½ t cream of tartar
4 C powdered sugar
In a large bowl whip together the egg whites and cream of tartar until its foamy. Add the sugar gradually whipping the whole time. I whipped it by hand with a whisk and toward the end when it was getting thick I just used a fork. I poured the icing into two baggies, one for white and one for green. I added some green food coloring and then massaged/mixed the color in until it was evenly mixed together. If the icing is too runny whip it longer to get it to thicken up. You want it thick enough to stay when you pipe it but not too thick to where you can't easily use it.
Start by laying the four walls down then put icing along one edge to stand the first wall up. Use a glass to support the walls while icing the others in place. As walls meet ice them together on the inside and outside and let it sit until it is sturdy. It only took about 10 minutes until I felt like it was ready for the roof. Put icing along the tops of the walls and place the roof pieces on top, ice the peak of the roof to help stick them together. For the trees I used green icing to glue the trees together along the edges, I glued 3 trees together to make 1 tree. These were a bit more difficult to put together but once the icing set a little bit they held.


I drew the windows and door onto the house with icing and then I followed the kids’ lead on where to put icing so they could decorate with the candy. We used M&M’s, gumdrops, cinnamon drops, mint leaves, gluten free licorice (which I found at Oak Street Natural Market), and sprinkles. I was really impressed with how well the kids did and we had a lot of fun.


I’m glad we can continue this tradition and happily make it gluten free.
how fun! I love it
ReplyDeleteThat came out so cute! A great tradition to
ReplyDeletekeep up at Christmas time.
I'm going to try this tomorrow Cindy!! I'll let you know how it comes out!! Even if it's a mess, I'm sure it will be fun!!
ReplyDeleteCarrie it was a lot easier than I thought it would be, take pictures!
ReplyDelete